Friday, 16 March 2018

Week 6 Photograph Assignment

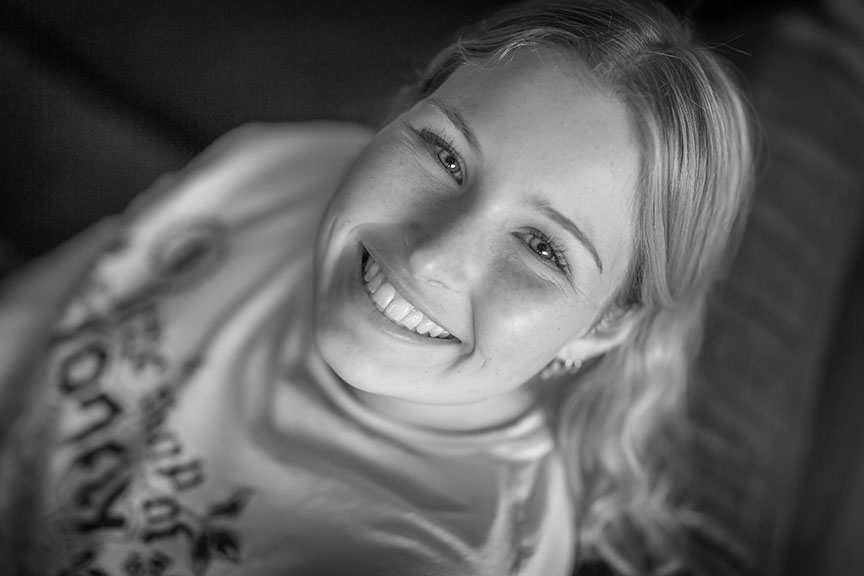
This weeks challenge was to get a monochrome image. For this shot, I had to return after the first photo session with Grace. She was super helpful. The first session I did not use a flash and afterwards was not happy with my results. This shot, however, I am happy with! I like the composition with the angled metal Grace is holding and the angle of Graces head offsets this well.

There is a silky silver smoothness to the skin tone. Yet the flash I used gives some contrast and depth to her face. The eyes are crisp and directly focused through the lens and she has a relaxed look about her. I have burnt the outer edge round her head to ensure the bright parts are not distracting. Her hand is slightly out of focus, yet face and eyes are sharp.


Monochrome Portrait Grace Ella

Canon EOS 5D Mark III
f/3.2, 1/1000sec, 85mm, ISO-500
Portrait. Processing in Adobe RAW

Friday, 9 March 2018

Week 5 Photographic Assignment Part 2

Woke up and decided I would change these images to monochrome and greys and I like them way more than in colour. It simplifies the image and gives a much smoother tone on the skin.


Thursday, 8 March 2018

Week 5 Photographic Assignment

This weeks task was to get a portrait of someone I did not know well. Key was to capture their personality and authentic look of them. This is a funny task as when I think I have it, as a photographer I start to doubt if I have. You start to not trust yourself. Then you have to say - well actually I did get it!


Portrait 1: Casey
Canon EOS 5D Mark III
f/3.5, 1/400sec, 35mm, ISO-800

I was first privileged to photograph Casey at work in a kitchen. Wow, he flys around the kitchen fast and I really had to be quick to keep up, sometimes getting an image and often missing the right place and angle. Casey is a very happy, relaxed person and smiles often. It was my first shoot in the kitchen so was getting to know the environment. I used a range of three lenses. However, this was my f/2.8, 16-35mm. I would have prefered the 35mm prime but its what I had. I like this image for the lighting, angle telling the story of what he does and it has Casey looking very natural. Out of about 90 shots, I chose this as the winner.

The following shot shows what a crop can do and how this image is improved. It gives more emphasis and focus on Casey.


Portrait 2: Rob Heath

Canon EOS 5D Mark III
f/3.5, 1/200sec, 85mm, ISO-800

My 2nd shot was with Rob Heath who is the head chef. Man what a cruisy guy and very competent food specialist. Rob has a wonderful salty beard and that seasoned look about him. He was very willing as a model and the challenge was to capture him at his best and natural. His focus on managing fire and cooking was a skill many would run from. Using my 85mm I struggled to get the right angle and distance. In hindsight I would have used a wider angle, however, I am happy with this result.


Portrait 3 Rob Heath

Canon EOS 5D Mark III
f/3.5, 1/200sec, 85mm, ISO-800

This shot to me is Rob! He is solidly strong, yet calm and quiet and thoughtful. A slight smile allows that kindness that Rob possesses, yet still has that old salt hardness of years of experience. The foreground allows the story to be told.


Portrait 4 Molly Ellis

Canon EOS 5D Mark III
f/2.8, 1/200sec, 85mm, ISO-500

I have been lucky to meet Molly at the villager I work at. She is a wonderful, bubbly and very photogenic person with a fantastic personality. What a treat to photograph someone like Molly. Here I tried to change the angle and work with different looks. This shot I used a fill-in flash bouncing the light off the opposite wall to even the light on her face.


 Portrait 5 Molly Ellis

Canon EOS 5D Mark III
f/1.8, 1/160sec, 85mm, ISO-500

This is my favourite of Molly. It has a slight level of cheekiness! The background compliments her light complexion and bright and happy smile. I could argue the eyes are a bit dark and a fill-in flash could have brought that out. This would have taken away some shadows on her face. Either way, I love the image. 

Well, I have to submit one of these for my assignment. Not really sure which one as I love them all for different reasons. Mostly I have loved doing the images and meeting these amazing people.

Andy

Friday, 2 March 2018

Week 4 Photographic Assignment

The plan this week was to capture  4 images.

  • The rule of thirds, with the subject on the intersection of the rule-of-thirds lines negative space in the other three quadrants. 
  • Perspective lines going into the distance. 
  • Repeated shapes. 
  • A canted frame.
All images have been only processed in ACR


The rule of thirds, with the subject on the intersection of the rule-of-thirds lines negative space in the other three quadrants. 


Canon EOS 5D Mark III
f/2.8, 1/160sec, 200mm, ISO-160

I chose this one as I thought this best met the criteria. Using a strong 200mm f/2.8 telephoto I knew it would compress the perspective and give me the best chance to produce Bokeh or at least blur out the background. I was concerned about the image taking up too much of the quadrant, however after working a few images think I have come close to what is required. It required me to get low, lying on the grass to get the angle correct. Quite relaxing once your there and sometimes I am happy to relax and just breath in the energy being so near the earth and plants.


Perspective lines going into the distance. 

Canon EOS 5D Mark III
f/11, 1/100sec, 16mm, ISO-400

When I started this project I ended up with three final images to choose from. I seemed to struggle to compose an image with perspective lines going into the distance because I could see them everywhere. However, I could not seem to compose something that was pleasing. The amazing part of the journey creating an image, especially when you are looking for a particular image is, images can pop up surprisingly without any planning. This particular one was just that! I was looking across and down in my visions. What attracted me to this image was the light, then this developed in composing. But all through this process, I was not focused on creating perspective lines. When I reviewed my work it struck me that this was the strongest image to select.


Repeated Patterns 

Canon EOS 5D Mark III
f/20, 1/160sec, 24mm, ISO-640

There are so many repeated patterns around us it is overwhelming to try to compose an image that works. Kep elements I used for this image were; creating a sunburst, positions of the vertical lines and linking from where the sun reflects the shadow of the holes across the opposing wall. From symmetrical repeated holes to slanted repeated holes. I also used a tilt/shift lens that enabled me to change my angles. Key also to this image is using a small f-stop and angle to create the starburst.


Canted (Dutch Tilt/Angle) Frame. 

Canon EOS 5D Mark III
f/13, 2sec, 17mm, ISO-100

This image took me a while to compose in my head and find the right place to create it. Often with my trials, I remembered you still need the four key aspects of any image; Clearly defined subject & background, a point of view, sense of balance and level of simplicity. Creating this image also required to wait for the right person to cross my frame, and as I had the timer set to two seconds, mirror lock, I had to time the image to get the subject in the right place. I like this image because also it depicts a female walking through the alley which provides a level of vulnerability. (Nicley it was well lit and relatively safe, I am pleased to say). This image worked better to convert to monochrome grey tones to simplify and allow the ey to use the leading lines to be taken to the subject and then cast past this to take in where the subject has come from.

Andy Thompson

Saturday, 24 February 2018

Playing around with new techniques.  Haha not sure about this as it is not my style - but fun to do

To do this I did a quick process in Camera Raw, Converted to B&W, then brought some slight colour back. Then created a background layer and after select and masking the subject, I then played with curves, filters and sharpened the image.

The background reminds me of my brain sometimes? So much swirling in it on possibilities for life


Friday, 23 February 2018

Week 3 Photographic Assignment

Architecture shot in low light: Canon EOS 5D Mark IV, f/11, 1/sec, 14mm, ISO-100. I set this shot up within the building I manage. I focused on where I was standing and waited for people to come by. I had to work this shot to get the right effect and right amount of people. I used a remote to be able to shoot at the time I required. Post processing in Camera Raw involved conversion to greyscale, sharpening and vignetting. I cropped the image to exclude space that was distracting to the image. Andy T


Landscape: Canon EOS 5D Mark IV, f/18, 1/13sec, 19mm, ISO-100. To get this image I got up at 0445, drove to the east side of the Otago Peninsula and hiked up to the summit of Hereweka. Using the rule of thirds I composed the image (camera on a tripod), camera settings required mirror lock and 2sec timer. I also took off the Neck strap as there was some wind to avoid any camera shake. I chose the 16-35mm lens as the blades on this lens allows for great starbursts. I used the full frame camera body as this is much better in low light/noise reduction. To create good star bursts timing is also important. Post processing was completed in Camera Raw - clarity, some contrast and increasing vibrancy slightly. - Andy T


Portrait: Canon EOS 5D Mark IV, f/3.5, 1/50sec, 123mm, ISO-100. I decided on a self-portrait as this seemed more challenging. I had to work the shot several times until I was happy with the outcome. Focus on the eye was critical with a shallow depth of field. Also, the colour of clothing made a difference as my first few shots I had the wrong t-shirt on. I used a remote to take the shot. To get a genuine smile I had to think of either two things - my wife - she makes me smile and or helping people at my work. Post processing in Camera Raw consisted of sharpening the eyes, reducing sharpness to soften the skin, correcting for white balance, sharping and whitening the teeth (remind me to brush better! – Andy T

Week 2 Photographic Assignment

I have started a photography course with SIT, Distance learning. I decided it will help me improve and I am wanting constructive feedback on my photography. So each week I will post up my assignments. I would love to hear your perspectives so please comment.

Week 2 Assignment:

The four images potentially are my worst work! Due to work pressures, not getting the information in an appropriate time I have been rushed or not planned for any of these images. All image processing has used only camera RAW
Portrait: I used an 85mm. Got to their eye level and works a few shots to get her to relax and capture this image - (probably my pick out of these four) I like the natural smile and moment I caught this image of her. I was in a rush and tired and limited gear with me, so natural light and a tree served as the environment. Metadata will show I was able to use good shutter speed to freeze any movement 1/5000sec, and which also meant I could lower my depth of field to f/3.2. I did push the ISO to 500. However, with a full frame, I was happy to allow that in this quick shoot. Processing involved Post processing involved adjusting highlights/shadows, sharpening the eyes and decreasing the clarity to give the skin a soft tone. I also adjusted the white balance for skin tone (used the white of the eye for this)


Architecture: I have tried an image to bring in perspective. I am not that completely happy with it. However, I think it does draw the viewers eye to the end of the hallway in the image. I used a 14mm, had little time to set the shot up. Exposure time was 5 sec, ISO-100 and f/16 to create a good depth of field. I locked the mirror up and used the camera timer. The histogram was great with the start of the image. However, after processing this has shifted having created a vignette to help give a tunnel effect and circular toning in camera raw. I also boosted the contrast to raising the starkness of the carpet and changed to Grey tones. I could do better by spending time lining up the hall better to ensure they were perfect for the 14mm.


Astro: My Gosh, what a terrible image! Sorry! Once I finally got the assignment task I had one night to go out and get a star shot. I was exhausted from the day so dragged my sorry but out and took this horrible image. It was windy, and the clouds were creeping over. I tried to get the stars sharp but could have done better. The composition has no planning and is rubbish! I dropped opened up the f-stop to 3.5, Upped the ISO to 1600, without any calculation for focal length guessed at 10sec. I used a 16mm to get a wide view. The masts are blurry cause it was windy. This image is rather an embarrassment. At least I got some stars and part of the milky way. Post processing involved adjusting highlights/shadows, increasing clarity, increasing exposure to gain more stars and colour and using a gradient to give the sky more mood.


Landscape: Average and rushed again. I had to give up a boot camp for this one. The idea was to create a starburst by using f/18 and a 16-35 with the right blades. Kinda got that! I was intending to use leading lines from the prop, starburst and rail lines to the star. This image I guess has potential, but then I heap of noise when viewed at 100%. Held at 1/80sec with such a wide angle and practising steady breathing I tried to allow for a sharp image. Even though the ISO is 100, there are many dark areas where my noise has come up. Arguably I have shot this image too dark. There is high clipping to the left of the histogram – hence the noise, and on the right of the histogram, I have lost tonnes of information. My exposure is all wrong!


Overall this is experience has been great! And the worst week for me to be creating 4 images of this nature. I hope to get more top of the game in the coming weeks once my course documents can be opened.

Andy Thompson